Yesterday, I posted a photo of my newest creating, the ruffle purse. I posted it in a few places and on facebook I got a really good response from it and promised a tutorial, I had already planned on making one, but never expected it to take about 8 hours.
 |
| 2nd attempt left, 1st attempt right. |
Don't worry, making the actual purse doesn't take that long, with the drafting (which isn't difficult) cutting and sewing (without taking all the photos and a dinner and cat break) then it should only take maybe 3 hours max. Before I start though, I wanted to point out that I made labels for my stuff. Right now they're pretty basic until I can get my friend Adam to help me with computerizing my actual design. Please bear with me though, as this is my first photo sewing tutorial. I've taught sewing classes in person, but photographically is a little different.
 |
| I used repositional mounting spray (temporary spray glue to attach some fabric to some 8.5x11 sheets of paper and ran them through my laser printer (I used thin fabric so I would minimalize the risk of jamming the printer) |
Onto the Tutorial.
In order to make this purse, you will need 2-3 different fabrics. I used 3 because I wanted a surprise pop of colour when you open the bag.
Materials list:
1/4 yard of a sturdy material
•Canvas or any heavy woven material will work.
1/4 yard a light weight cotton for the ruffles and strap
1/4 yard of your lining fabric
30" of wide ribbon
•the one I used is 13/8" wide and I have 100yds of it in eggshell and silver
1- 8" zipper
hand sewing needles
sewing machine (with regular and zipper feet)
Scissors
Iron and Ironing board
Realistically the amount of fabric I suggest could potentially make 2 purses, unless you're prone to mistakes, but a little extra never hurts.
I'm not sure what the fabric I used was because I got it from the remnants bin of the fabric store.
You will need the following pattern pieces that you will need to draft, but don't worry they're pretty straight forward to create since they're all made of straight lines. All the measurements specified are for sewing with a 1/4" seam allowance that is included, if you're more comfortable sewing with a 1/2" or 5/8" seam allowance then make sure to add an extra 1/4" or 1/2" to each number specified.
 |
| A= 6" B= 9" C= 2" the trapezoid shape I measured 2 inches at the bottom, 1/5 inch at the top and about 6 inches long (mark 6" up from the center of the bottom, then at the top of the 6" mark 1/4" on each side and connect the corners) |
 |
| The Top is also measurement A. D=2" E= 51/4" (on the inner pocket. Line E is 5" The pocket is 4" deep which I forgot to add on the photo) F= 61/4" The Ruffle strip is 18" long (it will be measurement G). It must be at least twice the purse width, if you want more of a ruffle I'd only suggest going with 2.5 times the width of the purse, otherwise it will be too much. |
You want to cut out each pattern piece. The main body piece (labeled front & back in the photo), and the purse side you want to cut 2 of each piece. the Purse bottom, cut one. These pieces are to be cut from your sturdy fabric. The Purse lining and inner pocket are cut on the fold. On the inner pocket piece the side labeled E is placed on the fold, with a mark on either side of the folded edge 5 inches apart to match up with Line E that you draw on one side of the lining. (the line is 13/4" from the top which I also forgot to write on the pattern)

The Ruffle you cut out either 3 pieces with the short edge on the fold or 6 if it's not on the fold of your ruffle fabric. You will also want to cut out one extra ruffle piece on the fold and cut it down to 21.5 inches for the strap. I cut all of mine on the fold. originally I got lucky and snipped every 2 inches along the selvedge and tore them and got straight lines from the grain lines, I wouldn't recommend that, except to straighten the top edge of your fabric.
Once you've cut your pieces from the fabric you can start sewing.
 |
| Sew the purse sides to the main body |
 |
| Sew all side seams together and clip a triangle off the top end to reduce bulk. the bottom of your purse will measure 21.5" at the bottom and 18" at the top. At this point you may want to press the seams open. |
 |
| take your ruffle pieces and fold the bottom up 1/4" and iron it down |
 |
| sew the hem (if you have your fabric with a 1/2" seam allowance this will be double turned to make a 1/4" hem. |
 |
| Sew the short ends together to form a tube with each ruffle piece. |
 |
| Press seam allowance open on all ruffle pieces. |
 |
| Set your machine to the longest stitch length |
 |
| Sew along the raw edge of each ruffle piece in the seam allowance. You may need to adjust the upper thread tension to have the fabric ruffle as you sew. Luckily mine does it automatically. some cases you will have to do 2 rows of basting stitches (long stitches that are not tacked down at the end) and ruffle by hand.) |
 |
| Place the ruffle on your purse body, the end of the ruffle shouldn't be flush with the bottom, it should have a space the width of the seam allowance. |
 |
| Mine is 1/4" away from the edge. |
 |
| Pull one (or two depending on how many basting rows you have sewn) of the threads, the one from the bobbin generally pulls more easily. The ruffle should be pulled enough to fit it around the area you are currently working on. |
 |
| Spread the ruffles evenly and pin in place. |
 |
| Sew down each ruffle. I learned from experience that sewing the ruffles is easier without the bottom of the purse attached. |
 |
| Use the same method to attach the remaining 2 ruffles to the purse, ensuring that the seam and top edge of the previous ruffle is covered by the bottom of the one above it. |
 |
| I kept the seams where the ruffles were joined on the sides of the purse, it looks neater. |
 |
| Attach your ribbon. I started it where the seams were to keep it consistent. Pin the ribbon in place and cover the raw edge of the top ruffle. There is supposed to be an uncovered space at the top for the zipper. |
 |
| Get an approximate measurement for the ribbon and snip leaving a little extra for seam allowances. |
 |
| Mark where your ribbon meets in the seam and with right sides together, sew that seam. |
 |
| Trim to 1/4" and clip triangles off the corners of the raw edges. |
 |
| You can press open or run your nail along the seam to flatten it out a bit |
 |
| Sew the ribbon over the top ruffle's raw edge either 1/8" or 1/4" from the edge of the ribbon making sure to catch the top ruffle in the seam. |
 |
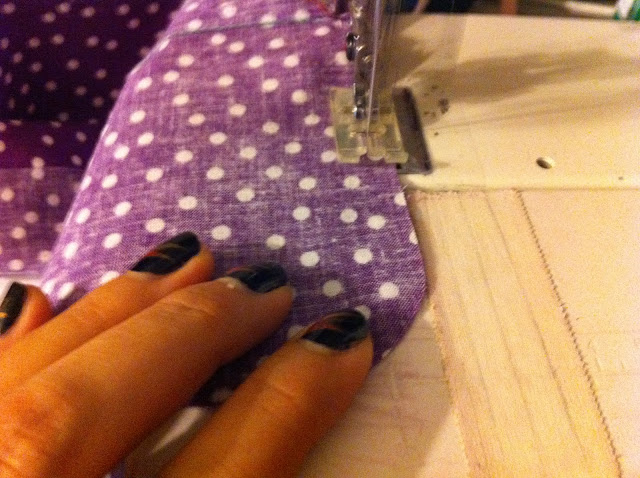
Change your machine foot to a zipper foot.
Regular zipper foot (Left) universal zipper foot (right) the universal foot is the foot that works only with my machine. |
 |
| Attach your zipper. I attached mine like an invisible zipper (Instructions here) |
 |
| Sew along the pencil line to get eliminate the gap |
 |
| Flip right side out |
 |
| stitch along the top edge of the ribbon and zipper. I found doing this before adding the zipper is a little easier to manoeuvre on the points but it gets caught in the zipper when it's added. At this point you can add the strap so that it's enclosed instead of sitting on top. |
 |
| Where the top ribbon wraps and the bottom wrap around there's a slight difference in length so a few stitches cover like this fix that issue. |
 |
| Flip the purse inside out again and pin the bottom to the purse all around. Make sure that you have not caught any bits of your ruffles in the pins. |
 |
| Sew with the seam allowance you used still making sure you keep the ruffles out of the seam. |
 |
| Clip the corners and turn right side out |
 |
| With right sides together pin pattern pieces to lining fabric |
 |
| the main lining must have the fold at the bottom |
 |
| pocket has the fold at the top. here you can decide if you want a curved bottom pocket or sharp corners. Personally I chose to make the bottom curved |
 |
| This is one method of transferring pattern markings. Wax free tracing paper. |
 |
| Layer as follows : Tracing paper RSU (right side up) one side of lining RSD, Pattern |
 |
| Use a tracing wheel or pencil and mark the pocket line. |
 |
| Cut out pocket (rounded corners used) |
 |
| Using an awl (or piece of a compass from a math set) mark where the x's are in the fabric on the fold. here they are 1/4" from the edge (the width of the seam allowance) |
 |
| You can also mark holes on either side of the line on the lining piece |
 |
| place the pocket on top of the lining, right sides together, matching the drill holes together and pin. |
 |
| I drew lines in different colours. The green is the sewing line (it has to be 1/4" from the orange line) Orange is the cutting line, with the triangles as well. |
 |
| Sew along the green line |
 |
| Cut along the orange line |
 |
| Pull the pocket through the line you just cut. |
 |
| It will look like this. |
 |
| flip over the lining to the wrong side and press the seams flat for the pocket. |
 |
| Sew the pocket edges together |
 |
| and sew down the sides of the lining (do not sew the top) |
 |
| square the bottom, fold to make the edges a triangle like this and sew a line that is 1.5" across (measure down 7/8" from the point) |
 |
| trim the corner |
 |
| press the top edge of the lining down 1/4" (or whatever seam allowance used) |
 |
| The purse should be inside out. With wrong sides together put the lining on the purse (kind of like a sock) |
 |
| This is called a mattress stitch, a running stitch that joins 2 fabrics without showing. This bit is a little time consuming, but if you tried to attach the lining with a machine it will be super difficult with different fabric weights and the amount of fabric will be hard to turn through a hole left, it's easier to just sew this by hand with right sides out. |
 |
| This is what it looks like when you finish attaching the lining. |
 |
| I added a label to this one. |
 |
| for the strap, cut a 2"x21.5" long strip |
 |
| fold and press in half the long way. |
 |
| open and fold the 2 edges to the middle and press |
 |
| then fold that in half again and press, also fold in a 1/4" on each end so the raw edges are enclosed |
 |
| Sew along all 4 sides with a straight stitch |
 |
| Hand stitch the strap to the top where the zipper begins and ends. |
 |
| Repeat for the other side of the strap, making sure you don't get it twisted and you're done. |
 |
| The inside complete with personalized label. |
If any of this tutorial confuses you, please feel free to leave me a comment or send me a message and I'll try to clarify as best as I can. Good luck and I hope to see any versions you make. I will link a facebook page when I finish making that.


wow you are very good at this and i don't know if i would hav the paitence to do that. well its a really cute design. i think ill try it. thanks for the tutourial.
ReplyDelete-N.A.